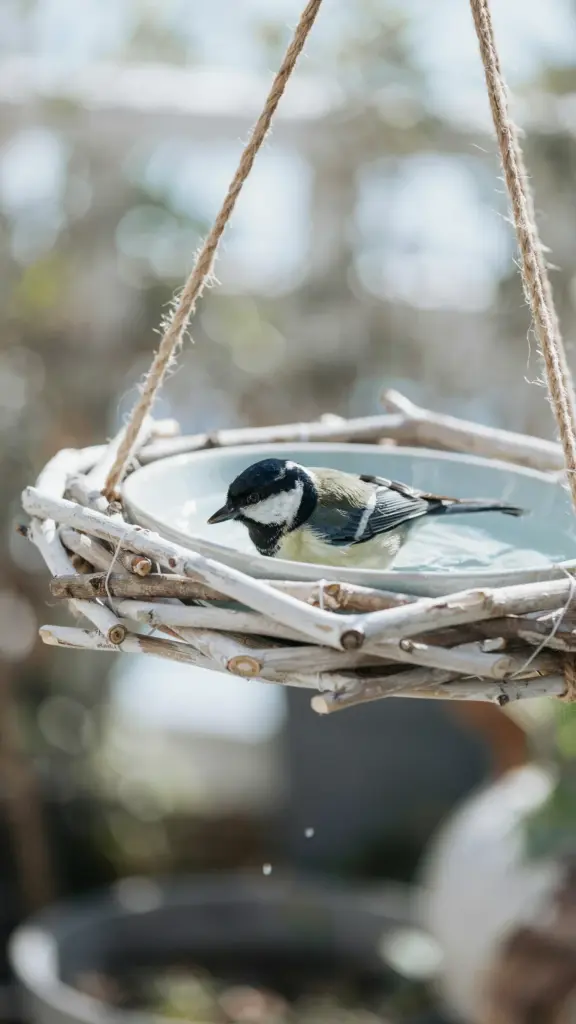
If you have been looking for a simple weekend project that brings more life to your garden, a DIY wooden bird bath is exactly what you need. Not only does it provide a reliable water source for local birds, but it also adds a natural, handcrafted touch to your backyard. I built mine last spring using leftover cedar boards, and within two days I had chickadees and finches splashing around. The best part? You can make this homemade bird bath from scrap wood or inexpensive lumber, and it doubles as a drinking fountain that attracts a steady stream of species for hours of peaceful observation. Here are six distinct ideas to get you started, each with its own charm and level of difficulty.
Simple Repurposed Board Bath for Beginners
This is the easiest way to dip your toes into building a wooden bird bath. You only need a square piece of plywood or an old shelf board, a short post or 4×4, and a few screws. I used a discarded pine shelf from a garage sale and cut it into a 12-inch square. After sanding the edges smooth, I attached it to a 36-inch tall fence post with exterior wood glue and deck screws. The key is to keep the basin shallow (no more than 2 inches deep) so birds feel safe. I added a small pebble in the center for a perch. Cost? Under $10 if you have scrap wood lying around.
Hanging Wooden Bird Bath for Small Patios
If your backyard is more balcony than lawn, a hanging bath is a smart solution. Use a wooden tray or a shallow wooden box (like a cut-down wine crate) as the basin. Drill three equally spaced holes near the rim, thread sturdy rope or chain through, and hang it from a shepherd’s hook or tree branch. I lined mine with a piece of pond liner to prevent leaks. A hanging wooden bird bath for small spaces works especially well because it sways gently, which some birds find reassuring. Just make sure the rope is weather-resistant cotton or nylon. Replace it every year to avoid rot.
Tiered Wooden Bird Bath with a Plant Shelf
For gardeners who want both water and greenery, a tiered design is ideal. Build a two-level structure: a lower wide basin for birds and an upper shallow saucer for succulents or moss. I used cedar fence pickets for the base and a wooden salad bowl (from a thrift store) for the upper tier. The water from the top drips slowly into the lower bath, creating a gentle trickle that attracts more birds. This tiered wooden bird bath DIY project takes about three hours but looks like a professional piece. Seal both basins with a food-safe waterproofing oil to protect the wood without harming birds.
Upcycled Pallet Wood Bird Bath with Rustic Charm
Pallets are free and full of character. Disassemble one carefully, then cut the slats into 10-inch lengths. Arrange them in a square pattern for the base and a smaller square for the bowl (line the bowl with a plastic lid or a shallow plant saucer). I screwed the slats together, leaving small gaps for drainage. This pallet wood bird bath project requires no special tools except a saw and a drill. The rough texture gives birds good footing. One tip: sand the inside rim smooth so tiny feet don’t get splinters. Finish with a coat of linseed oil.
Rustic Log Bird Bath from a Fallen Branch
If you have access to a thick log (a clean branch about 8 to 10 inches in diameter and 18 inches long), you can turn it into a one-piece bath. Hollow out a shallow depression on the top using a chisel and mallet, or use a forstner bit to create a bowl shape. A rustic wooden bird bath from logs looks completely natural and blends into any garden. I used a piece of birch that had fallen in my yard. To keep it stable, flatten the bottom and carve a small notch for water drainage. Wood from birch, maple, or oak works best. Treat the inside with a natural beeswax and mineral oil mix to slow cracking.
Painting and Sealing Your Wooden Bird Bath for Long Life
No matter which design you choose, the right finish makes all the difference. Unprotected wood will crack and warp within a season. Use a water-based exterior paint or a clear marine-grade varnish. I recommend painting only the outside and leaving the inside bare or sealed with a food-safe oil. Bright colors like sky blue or soft green attract birds, but earth tones blend in better. Always let the paint cure for at least 72 hours before adding water. A well-sealed wooden bird bath can last three to five years outdoors. Reapply oil every spring to maintain the wood.
Adding a Dripper or Fountain for Extra Attraction
To make your bath a true drinking fountain for birds, add a simple solar-powered dripper. You can buy a kit for around $15 that includes a small pump and a tube. Place the pump in a reservoir (an old plastic bin buried near the base) and run the tube up inside the post or branch
#DIYBirdBath #WoodenBirdBath #BackyardBirdProjects #UpcycledWoodDecor #GardenBirdBath