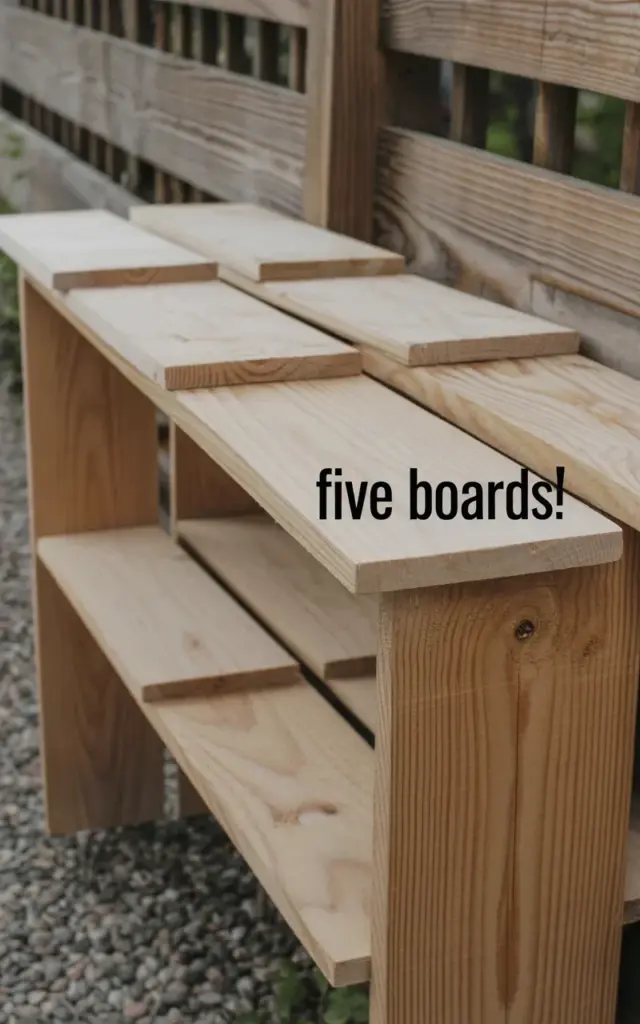
There’s a photo floating around on my phone that I keep coming back to. It’s a shelf made from five pieces of pine, all screwed together, no stain, no fancy joinery, just raw wood and a cordless drill. That photo is what led me to build this DIY pine shelf on a random Saturday morning, and honestly, it’s the easiest woodworking project I’ve done in years.
In that close-up shot, you can see exactly what you’re working with. The boards are lined up horizontally, equal in length but slightly different widths, and the grain runs wild with knots and swirls. The text over the image just says “FIVE Boards!” in bold black letters, and that’s the whole trick. Nothing hidden, nothing complicated. Just five pieces of common pine and a handful of screws. If you’ve ever hesitated to start a woodworking project because it looks too involved, this one will change your mind.
The Five Boards That Started It All
Ok so, the shelf in the photo isn’t some custom-cut masterpiece. I used standard 1×6 pine boards from the hardware store, the kind that sit in the lumber rack and collect dust. You know the ones. They’re cheap, they have knots and small cracks, and they smell like a lumber yard in the best way possible.
I grabbed four boards for the front, back, and shelves, then a fifth board that I ripped down the middle to make the side pieces. Wait, that’s actually six pieces if you count the rip, but the design is still based on five original boards. The photo shows five equal-length horizontals, and that’s the cleanest way to build it. The side pieces are simply made from one board cut in half, but they read as part of the five-board system. Anyway, that’s how I did it.
What You Need for a Pine Wood Shelf
Here’s the thing about this project, you don’t need a workshop full of tools. I fit everything in a small plastic toolbox and worked on my back porch. A miter saw helps for clean ends, but a circular saw with a straight edge works fine too.
Here’s what I used:
– One 1×6 pine board for the top and bottom (or two boards if you want a thicker look)
– Two more 1×6 boards for the inner shelves
– One extra 1×6 board for the sides and the back support
– A box of 1.5-inch wood screws (the coarse thread kind for softwood)
– A drill with a Phillips bit and a countersink bit
– Sandpaper, 120 grit and 220 grit
That’s honestly the whole list. I didn’t use glue, because screws are plenty strong for a shelf that holds a few books and a plant. I didn’t use any brackets or metal supports either. The board joints take care of the strength, and the whole frame sits flush against the wall when you hang it.
Cutting and Arranging the Boards for a Rustic Look
This is where you get to be a little lazy, which is a good thing. I measured the space where I wanted the shelf, and I cut four boards to exactly the same length. For mine, I went with 24 inches long, which gives you a nice compact shelf without any sagging in the middle.
Then I arranged them on a flat surface, side by side, with the best faces pointing down. Here’s the thing, pine boards from the same store often come from different trees, so the color can vary slightly. I actually kind of love that. One board was more orange, another was pale yellow, and one had a dark knot right in the center. Instead of trying to match them perfectly, I pushed them together and let the variation tell the story. That’s your reclaimed wood look without paying reclaimed wood prices.
For the side pieces, I cut one board into two pieces, each about 6 inches tall. You’ll screw those into the ends of the horizontal boards. And then I cut one more short piece as a back brace, but honestly, if you’re hanging this on a wall, the brace just adds extra stability. I used it because I’m a belt and suspenders kind of person.
Screwing It Together Without Overthinking
No one will believe this, but I didn’t even pre-drill the screw holes. Pine is soft enough that a sharp screw will just bite right in, especially if you use a countersink bit to make a little recess. I learned that trick from a friend who builds floating shelves, and it saves so much time.
Start by screwing the two side pieces to the bottom board. Then screw in the next shelf board about six inches up, then the next one, then the top board. That’s the whole assembly. I did it on the porch floor, balancing the boards on their edges, and I clamped a scrap piece of wood to keep everything square. You don’t need a fancy clamp. A heavy book works too, or just hold it with your knee.
The trick is to keep the boards tight against each other while you drive the screws in. If you crank them down too hard, the wood will split near the edge. So just snug them up nice and even. No need to sink them deeper than the surface.
Why I Left It Unfinished (and You Should Too)
I know some people will want to stain it or paint it. Don’t. Just don’t. The natural grain and those little knots give the shelf so much character, it would be a shame to cover any of it with a coat of cherry stain.
I did a light sanding with 120 grit to knock off the rough spots, then a quick pass with 220 grit to make it silky smooth. That’s it. I left the surface bare, with no sealer or lacquer. The raw pine will pick up a little patina over time, which is fine. If you spill water on it, you’ll get a faint mark, and that’s part of the rustic charm. If that bothers you, wipe on a coat of clear matte polyurethane, but in my opinion, you’re just adding an unnecessary step.
The photo shows the shelf with that unfinished look, and it matches the whole vibe of the project. Raw, simple, and honest. You can see the slight variations in the board widths, the knots that look like tiny eyes, and the soft sheen where the sanding smoothed out the fibers. That’s what makes it look like reclaimed wood, without actually having to pull nails out of old barn boards.
Hanging and Styling Your Reclaimed Wood Shelf
This is a part that a lot of tutorials skip, but it matters. Since the shelf is just a rectangular box, you can hang it two ways. You can either screw it directly into the wall studs from the inside, or you can attach a couple of keyhole hangers to the back. I used simple metal hanger brackets because I live in a rental and I didn’t want to leave giant holes.
Honestly, for a small shelf like this, a couple of screws through the back brace into the drywall with anchors is plenty. The shelf is lightweight, maybe four pounds empty, and even with a few heavy books, it won’t pull down if you use proper anchors. I marked my studs with a stud finder, drilled two pilot holes, and screwed it right into the wall. Took me exactly twelve minutes, and I’m not being dramatic.
For styling, keep it simple. I put an old green glass bottle on the lower shelf, a stack of paperbacks on the middle, and a small potted succulent on the top. Because the wood has such a strong grain pattern, you don’t want to clutter it with too many decorations. Let the shelf itself be the piece.
A Few Notes on Working with Pine Wood
Pine is forgiving, but it does have a couple of quirks. First, it dents easily, so don’t drop a hammer on it. Second, it moves with humidity, so a shelf that fits perfectly in summer might feel a bit tighter in winter. It won’t break, just creak a little. That’s normal.
Also, those knots can be tricky. If you screw directly into a loose knot, the wood might crack or the knot might fall out. I moved my screw placement just a tad to avoid the big knots, and that made a huge difference. If you end up with a crack, it’s not the end of the world, just squeeze some wood glue in there and wipe it clean. No one will see it from across the room.
One last thing. The photo shows the shelf at a slight angle, which makes the board thickness visible. That’s a good reminder to use actual 1×6 boards, not the thinner 1x4s. The extra thickness gives the shelf a chunky, substantial feel that you just don’t get from a flimsy floating shelf kit.
So there it is. Five boards, a few screws, and an hour of your time. The best part is that you can scale this up or down without changing anything else. Use longer boards for a bigger shelf, or stack two frames together for a bookcase. I already have a second one planned in my head.
If you’ve been looking for simple wooden shelf ideas that don’t require a full woodshop, this is the one. Save the photo, grab a board, and just build it. You’ll be glad you did.