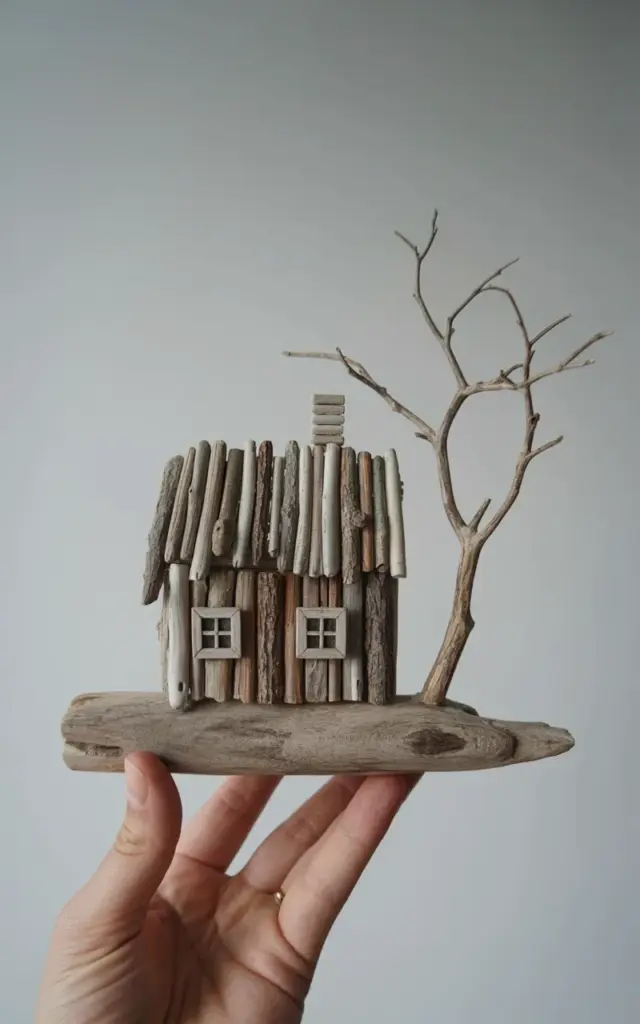
There is a tiny house sitting on my desk right now, its roof a cascade of weathered gray shingles that look like they have survived a hundred storms. The little driftwood chimney leans just enough to feel real, and beside the front door, a single bare branch twists upward like a tree that refuses to give up. Honestly, this piece of DriftwoodArt stopped me mid-scroll when I first saw it, not because it was flashy, but because it felt quiet and alive. It made me think about all the ways people try to build something similar and end up with a gluey mess that looks nothing like the beach.
I have been assembling reclaimed wood decor for years, both for my own mantel and for friends who keep asking me to make them one. Ok so, I have also made every single mistake you can possibly make with driftwood. I glued my fingers together, I used the wrong finish, I picked branches that looked cool but crumbled into sawdust the moment I tried to cut them. The good news is that the mistakes are easy to avoid once you know they exist. This guide is written as a trail through those errors, with the finished house sculpture as our constant reference point.
Common Mistake Number One: Gluing Everything Together Immediately
The biggest urge, and the one every new builder feels, is to grab the hot glue gun and start sticking pieces together the second you get home from the beach. You have a pocket full of wet sand and a vision, and you want to see it become real right now. I get it, I really do. But hot glue on damp wood is a recipe for disaster, and honestly, so is rushing the design process.
The smarter approach is to lay everything out on a table first and stare at it for an embarrassing amount of time. Arrange the roof shingles like the layered pieces in the photo, working from the bottom edge up so the water would run off naturally. Place the chimney, then move it, then move it again. This planning stage is where you look at a gnarled branch and decide exactly how it will stand off to the side like a windswept tree. Let the structure sit in its dry layout for a few hours, or even overnight, before you commit to any adhesive.
How to Pick the Right Driftwood for a Miniature House Without Ruining the Vibe
Not all driftwood is created equal, and this is the point where most people grab the first piece of wood they see. You want material that has been weathered for a long time, preferably tumbled by waves until the edges are soft and the surface feels almost like suede. The brown and gray tones that appear naturally will give your project that authentic, sun-bleached look without any staining work on your part.
Avoid anything that feels brittle or powdery, because it will break when you try to cut it down to size. Look for pieces that have a solid density to them, like they could survive another ten years in the surf. For a project like the house in the image, you need small, flat pieces for the shingles and a structurally sound piece for the chimney. Collect more than you think you need, seriously, because about a third of what you pick up will get rejected during the design phase.
Forcing the Branch to Be the Star When It Should Be the Supporting Actor
That bare, intricate branch next to the house is eye-catching, and it is very tempting to make it the centerpiece of your entire sculpture. Here is the thing: if the tree overpowers the house, the whole composition loses its charm. You end up with a weird stick fortress instead of a tiny home with a windswept yard. The branch should feel like a natural part of the environment, not a screaming focal point.
When you position the branch, angle it so it leans away from the house slightly, as if the wind has shaped it over decades. It should sit a little off to the side, like it does in the photo, and its roots or base should disappear into the same ground or base that holds the house. This creates a story, a shared landscape where both elements belong together. If your branch is too large, be ruthless and break off the heavier arms. You want delicate, intricate details, not a club.
Ignore the Cleanup Step and Your Driftwood House Will Smell Like a Tide Pool Forever
Nobody wants to hear this, but beach wood is full of organic matter that will decay inside your home if you skip the cleaning phase. Tiny marine organisms, hidden pockets of salt, and microscopic bits of seaweed all live in the crevices. If you seal that stuff into your miniature house sculpture, it can develop a musty odor that never really goes away. I learned this the hard way with a piece of reclaimed wood decor that smelled like low tide for six months.
Here is a practical checklist for cleaning your collected wood:
- Submerge the pieces in a bucket of fresh water for two days, changing the water each morning to draw out the salt.
- Brush the wood gently with a stiff bristle brush to remove loose fibers and caked-on debris, but be careful with fragile areas.
- Bake the smaller pieces in the oven on a low heat, like 200 degrees Fahrenheit, for about 30 minutes to kill any hidden pests.
- Let everything air dry completely in a dry room for a few days before you start gluing.
I know baking driftwood sounds insane, but it kills dormant insects that would happily hatch and eat your art. The process takes time, but it is the only way to make sure your BeachWoodCrafts last for years instead of turning into a biology experiment.
Skipping the Perfect Base and Leaving the Whole Scene Unanchored
A driftwood house needs a foundation, even if that foundation is just a flat slice of a larger log. The sculpture in the photo sits on a flat surface that visually grounds the entire piece. Without a base, your house will wobble, the branch will feel disconnected, and the whole thing will look like it is floating in an empty void. It is one of the most common beginner tells.
You can use a thick slice of branch, a piece of flat slate, or even a ceramic tile that you cover with a thin layer of sand and pebbles. The key is to make the base look like the ground where the house was found, not like a random coaster. Attach the house and the branch to the base with a strong adhesive made for wood, like a two-part epoxy or a quality wood glue. Clamp the pieces in place while it dries, because gravity is not your friend here and things will slide.
Using the Wrong Finish and Turning the Wood Into Plastic
There is a fine line between protecting your reclaimed wood decor and ruining the natural finish that makes it beautiful. Many people reach for a glossy polyurethane spray, and the result always looks wrong. The wood ends up reflecting light like a shiny toy, and every gorgeous weathered texture is hidden under a layer of artificial gloss. It is a shame to spend all that time finding perfect beach wood and then sealing it under plastic.
Instead, use a matte finish or a simple natural oil finish that sinks into the wood and leaves the surface looking dry and chalky. A matte acrylic spray is a safe bet, or you can use a finishing wax that you buff in gently with a soft cloth. The goal is to protect the wood from dust and humidity while preserving that soft, sun-faded patina. The house in the reference image has a natural matte look, and that is exactly the feeling you should chase.
Giving Up Too Early and Letting Impatience Ruin the Final Result
Building a MiniatureHouse out of driftwood is not a one-hour craft project. It is a slow, meditative process that takes time, and your first attempt might not look perfect. Not gonna lie, I have scrapped entire houses because the roof lines were crooked or the branch placement felt awkward. That is fine, that is part of the process, and it is how you get better at reading the wood.
Take breaks when you get frustrated. Walk away from the workbench and come back an hour later with fresh eyes. The wood is not going anywhere, and a clear head always makes better design decisions. As long as you are following these steps, gluing carefully, choosing the right materials, and letting each stage dry completely, your finished piece will be worth the wait. WoodenHomeDecor built this way carries a story in every grain, and people can tell the difference.
So, would you display this little house sculpture in your home? Let me know in the comments, and share a photo if you have tried making your own. There is something deeply satisfying about bringing a piece of the beach inside to live on your shelf. Just remember to be patient, keep the matte finish handy, and let the driftwood guide your hands.