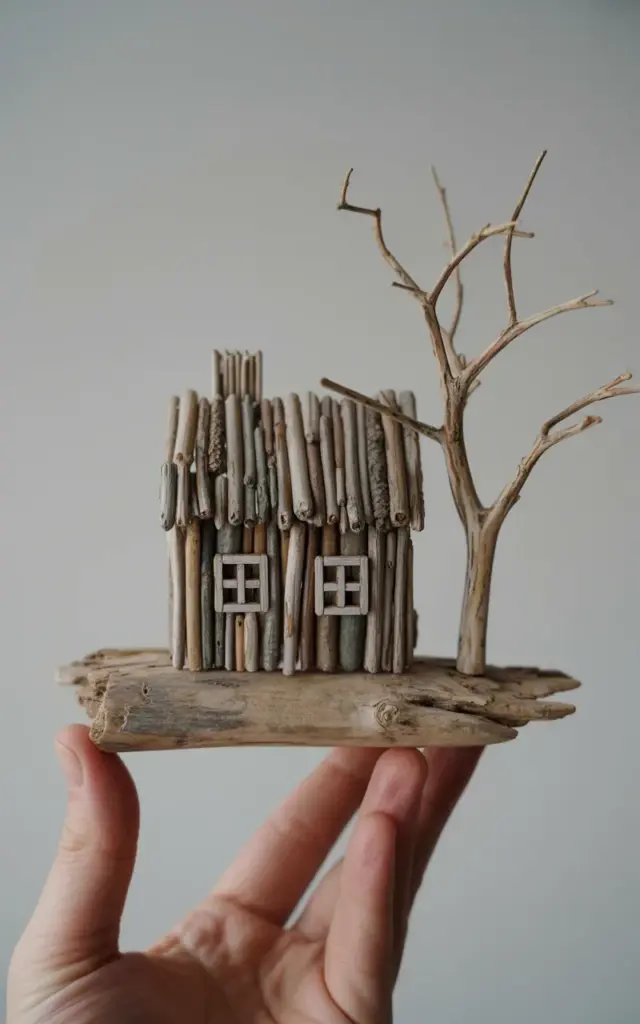
If you have ever walked a shoreline and found yourself picking up pieces of sun-bleached wood, you already understand the appeal of a driftwoodhouse. There is something deeply satisfying about transforming discarded timber into a miniature home. This particular sculpture uses reclaimed wood to build a small structure with a steep shingled roof, tiny windows, and a bare branch standing beside it. The weathered brown and gray tones give it a quiet coastal feel, and a simple beeswax seal keeps that natural look intact. The best part is that you can create something similar without spending much money at all.
Why driftwood works beautifully for miniature homes
Driftwood has a character that new wood simply cannot mimic. The salt, sun, and sand have already done the hard work of aging it, giving each piece unique textures and muted tones. For a miniature house, these qualities matter because they make the finished piece look like it has stood by the sea for years. The natural cracks, grain patterns, and soft edges add depth and realism. You also avoid the cost of buying finished lumber or craft wood. A single walk along a beach or lake shore can yield enough material for several projects. This keeps your hobby affordable while giving each sculpture its own distinct personality.
Sourcing reclaimed wood without spending a dime
Gathering driftwood is the most budget-friendly part of this craft. Start by visiting local beaches, riverbanks, or lakeshores after a storm. Look for pieces that are dry and solid, not crumbly or waterlogged. Small branches work well for the roof shingles, while thicker pieces form the house body. If you do not live near water, check construction sites, pallet drop-offs, or scrap wood piles from furniture makers. Always ask permission before taking anything. You can also ask friends or neighbors if they have old fence boards or deck remnants they plan to throw away. One person’s trash is perfect material for a miniature home.
- Check beaches and shorelines after high tide or storms for freshly deposited wood
- Ask local carpenters or woodshops for small offcuts they would otherwise discard
- Look for broken pallets behind stores (with permission) and break them down for thin planks
- Use fallen branches from your own yard after a windstorm, let them dry fully before use
Building the steep shingled roof on a budget
The roof is the most eye-catching part of this driftwood house. To create that layered shingled look, collect thin, flat pieces of driftwood that are roughly the same thickness. You can split larger pieces with a small knife or chisel if needed. Start at the bottom edge of the roof and work upward, overlapping each piece like actual shingles. Use a strong wood glue or a hot glue gun for a secure hold. Do not worry if the pieces vary slightly in width. That unevenness adds to the handcrafted feel. For the steep pitch shown in the photo, cut the roof base from a thicker piece of wood at a sharp angle before attaching the shingles. This gives the structure its distinct silhouette without requiring expensive tools.
Adding tiny windows and a bare branch detail
The small square windows in this sculpture have white details that stand out against the dark wood. You can replicate this using thin white painted craft sticks or even matchsticks trimmed to size. Cut the window openings into the house body with a small saw or craft knife before assembly. Glue the white frames in place from the inside or outside depending on your preference. The bare tree branch on the right side is a simple but powerful addition. Find a small branch with natural twists and multiple offshoots. Dry it thoroughly and trim the base flat so it stands upright. Position it beside the house to suggest a windswept coastal landscape. That single branch gives the whole scene a sense of place and movement.
Sealing with beeswax to preserve the weathered look
Many crafters reach for varnish or polyurethane, but those products often make driftwood look glossy and artificial. A light coat of beeswax is a better choice for a natural finish. Beeswax soaks into the wood, deepens the color slightly, and leaves a soft matte sheen. It also protects the surface from dust and minor moisture without hiding the texture. You can buy a small tin of furniture-grade beeswax for a few dollars, or melt your own from wax beads. Warm the wax slightly with a hair dryer or by placing the tin in warm water, then rub it into the wood with a soft cloth. Buff gently after a few minutes. The result is a finish that feels smooth but looks untouched by modern chemicals.
Where to display your miniature driftwood home
This type of sculpture fits naturally on a coastal shelf, a windowsill, or a mantelpiece. Its neutral tones work well against light or dark backgrounds. If you place it near a window, the natural light will bring out the grain and the subtle beeswax glow. You can also group it with other small beach finds like sea glass, shells, or smooth stones to build a tiny coastal scene. Because the house is made from reclaimed materials, it is lightweight and easy to move. Just keep it out of direct sunlight for long periods, as UV rays can fade the wood over time. A simple dusting with a soft brush is all the maintenance it needs.
Creating a miniature driftwood house sculpture does not require a workshop full of tools or a big budget. A few hours of beachcombing, some basic glue, and a small amount of beeswax are enough to build something that looks both rustic and refined. The bare branch and steep roof give it a story, as if it has stood against coastal winds for decades. If you decide to make one of your own, take your time selecting the wood and arranging the shingles. That patience is what turns a pile of reclaimed scraps into a tiny home worth noticing.
#driftwoodhouse #reclaimedwood #driftwoodart #miniaturehome #woodencraft