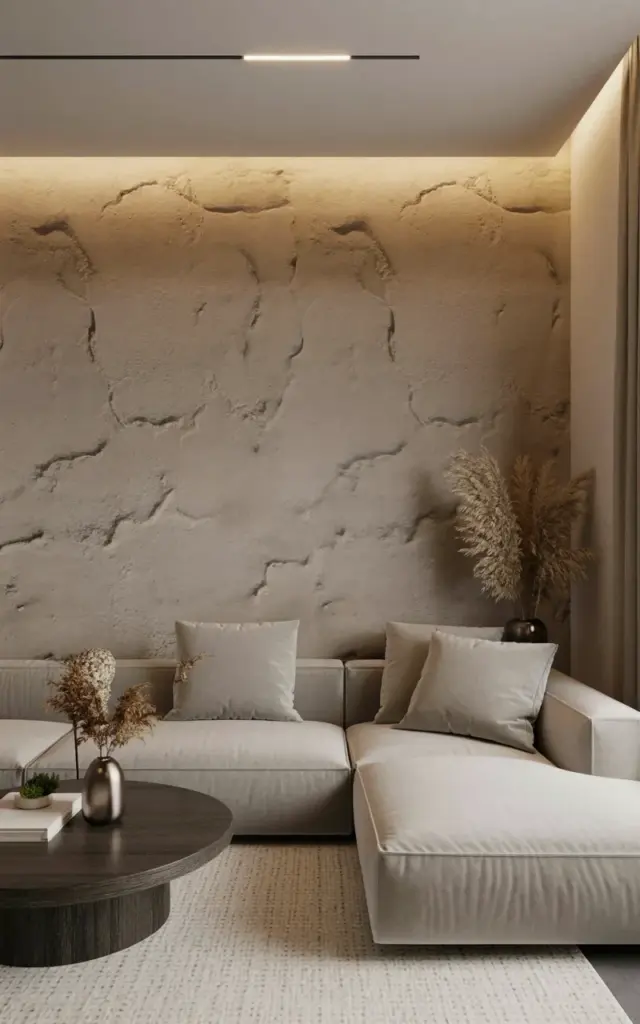
The first time I saw this exact setup, the one with the beige stucco accent wall and those hidden LED strips, I honestly stopped scrolling. There’s something about the rough organic surface catching soft shadows that makes a room feel instantly warmer, more lived-in. That’s the whole trick: a textured accent wall doesn’t need to shout. It just needs the right light behind it, and suddenly the space feels modern but cozy at the same time. That’s the real reason I’m writing this. I want to show you how to get that same effect in your own living room, without the guesswork.
Look, the photo in this post has a few specific things going for it. The wall is a soft beige stucco with natural undulations, not a perfectly flat or heavily patterned finish. Then there’s the curved beige L-shaped sectional with plush cushions, a round dark wood coffee table with a textured surface, and a few decorative items on top. But the star is the light. Hidden LED strip lighting behind stucco creates those dramatic shadows and highlights that make the whole wall feel alive. So let’s break down how to pull this off, step by step.
## Why Stucco and LED Lighting Work So Well Together
Here’s the thing about stucco. It’s not smooth. It has dips, ridges, and tiny peaks that catch light from different angles. When you hit it with a direct overhead light, all that texture flattens out. But when you place a linear LED strip close to the wall, grazing across the surface, every bump casts its own little shadow. The result is a depth you can’t get with paint or wallpaper.
I’ve tried this with other materials, like limewash and textured plaster, and honestly, stucco is the best for this. Why? Because the texture is thick enough to create real shadows, not just subtle color changes. Plus, stucco is forgiving. If you mess up a patch, it just looks like part of the organic surface. You don’t need perfect technique for this to look good. You need the right lighting angle, and a little patience.
And the hidden part matters too. When someone sees a glowing wall, they assume there’s a fixture somewhere. But with LED strips tucked into a small recess or behind a trim piece, the light seems to come from nowhere. That’s the magic. It makes the room feel like it’s glowing from within, not like you put a lamp behind the sofa.
## Choosing the Right Stucco Finish for Your Accent Wall
Not all stucco is created equal. You want a finish that has visible texture, but not so much that it becomes distracting. The thick troweled look, where you can see the swirls and strokes, is perfect for LED lighting. A smooth skip-trowel or a light sand finish works too, but the shadows will be less dramatic.
So before you buy a bag of stucco mix, think about the scale of your room. A large living room can handle a more pronounced texture. A small space, maybe a hallway or a bedroom nook, needs something subtler. I learned this the hard way. I used a heavy texture on a small wall once, and the shadows went wild. It looked like a cave, not a living room.
Here’s a quick breakdown of what works:
– **Skip-trowel finish**: This is the classic. It has a mottled, irregular look that feels handmade. Great for modern minimalist rooms.
– **Tornado finish**: Swirls of trowel marks, more movement. Better for larger walls where you can step back and see the pattern.
– **Sand finish**: Subtler, finer texture. Good if you want a softer glow without harsh shadows.
– **Santa Barbara finish**: A smoother, more Mediterranean style. Still catches light, but the shadows are gentler.
For the photo we’re referencing, the wall looks like a medium skip-trowel. It has those natural undulations, not too uniform, not too chaotic. That’s your safe zone.
## The DIY Process: Installing Hidden LED Strips Behind Stucco
Ok so the process isn’t hard, but it does require some planning before you start mixing stucco. The key is to create a small recess or channel for the LED strip to sit in. You can do this by attaching a piece of wood or metal track to the wall first, then stuccoing around it. After the stucco dries, the strip fits into that gap. Simple.
But here’s a detail most tutorials skip. The LED strip needs to be slightly below the face of the stucco, not flush with it. If it’s flush, the light will be too direct and you’ll lose the grazing effect. So the recess should be about a quarter to half an inch deep. That’s enough to hide the strip, but low enough for the light to hit the texture at an angle.
You’ll need a few things:
– LED strip lights, preferably with a CRI of 90 or higher for accurate color
– An aluminum channel or DIY wood housing
– A dimmer switch and a 12V or 24V power supply
– Stucco mix and a trowel
– A putty knife and sanding block for touch-ups
When you run the strip, make sure it’s straight and secure. I like to use double-sided tape along the whole length, not just the ends. And leave a little extra cable at both corners, because you’ll want to adjust the position before you stucco over the edges. That’s something I didn’t think about my first time. I had to cut and re-splice the strip because I didn’t leave slack. Not a huge deal, but annoying.
## How to Position Your LED Lights for Maximum Shadow Play
This is the part that separates a good installation from a great one. The distance between the LED strip and the wall, plus the angle of the light beam, determines everything. Too close, and you get a harsh hot spot. Too far, and the light spreads out so much that the texture barely shows.
For a stucco wall, aim for a 45-degree grazing angle. That means the LED strip is positioned at the bottom or top edge of the wall, aimed upward or downward across the texture. In the photo, the light seems to come from the bottom, behind the sofa, washing up the wall. That’s a classic choice because it makes the texture feel like it’s rising out of the floor.
A few tips that actually work:
– Place the strip 3 to 6 inches away from the wall surface. Any closer, and you’ll see every tiny imperfection. Any farther, and the shadows soften too much.
– Use a diffuser if your strip has visible individual LEDs. The diffuser spreads the light evenly and prevents a dotted line effect.
– Test with a temporary strip before sticking it down. Hold it in place, turn it on, and move it around. You’ll see the difference immediately.
– Don’t forget the corners. A small strip around a 90-degree corner creates a continuous glow that feels intentional and polished.
And honestly, the best way to figure out your perfect position is to play with it. No amount of reading will replace the moment you slide the strip a half-inch and the whole wall just clicks. That’s when you smile and say, “ok, that’s it.”
## Styling the Rest of the Room Around Your Textured Wall
Once your stucco wall is glowing, you need furniture that doesn’t compete with it. The photo shows a curved beige L-shaped sectional with plush cushions. That curved shape is smart because it mirrors the organic undulations of the wall. Hard angles, like a boxy sofa, would fight the texture. So go for soft lines and rounded forms.
A round dark wood coffee table is another good match. The dark wood creates a visual anchor against the lighter beige wall. And the round shape echoes the curves of the sectional. On the table, you can place a few small decorative items, like a ceramic vase or a stack of books. Just keep it minimal. The wall and the lighting are the main characters.
For a modern minimalist look, stick to a neutral palette. Beige, gray, earthy tones. The light gray accent pillows on the sofa in the photo are perfect. They add a touch of softness without drawing attention away from the wall. And if you want a little contrast, add a single darker throw blanket, but don’t go overboard. Too many colors will wreck the calm vibe this kind of setup creates.
## Seasonal Adjustments to Your LED Light Color and Brightness
Here’s where you can really make this wall work all year. Most LED strips are tunable, meaning you can change the color temperature. In the warmer months, set the light to a cooler white, around 5000K. It feels crisp, like morning light on the sand. In the fall and winter, drop it to a warm 2700K. The wall suddenly feels like a fireplace, even without a fire.
I know some people think that’s too much fuss, but honestly, it takes two seconds. I have a remote control next to my couch. I change the color temp once a month while I’m sitting there. It’s like adjusting the thermostat, but good for your mood instead of your utility bill. And the texture of the stucco responds beautifully to both temperatures. Cool light sharpens the shadows. Warm light softens them.
You can also play with brightness. On a lazy Sunday afternoon, set it to a low dim glow, just to create a subtle halo behind the furniture. For a dinner party, crank it up a bit. The key is having a dimmer that goes all the way down to maybe 5%. Most standard dimmers don’t go low enough. I ordered a specialty one from a home automation brand, and it was worth every penny.
## A Few Practical Mistakes I Made So You Don’t Have To
Alright, let me be real. My first stucco wall with LED lighting didn’t turn out perfectly. I made a couple of mistakes that I’d rather you avoid.
First, I used a LED strip with a low CRI, like 80. The colors looked washed out. The beige stucco turned a strange yellowish gray. I had to replace the whole strip. So spend the extra money on high CRI. It’s not a fun way to spend your budget, but it matters.
Second, I didn’t seal the stucco before installing the lights. So the dust from the stucco settled into the LED strip and made it look grubby. After that, I sealed the wall with a matte sealer, let it dry, then installed the strip. Clean and clear.
And third, I put the strip too close to the wall, like an inch away. The hot spot was obvious and weirdly bright in the middle. Once I moved it back to four inches, the light spread nicely. That little adjustment changed everything. So don’t skip the test phase, even if you’re feeling lazy.
Actually, I also forgot to leave a small access panel. When my power supply died, I had to cut through the stucco to get to it. Not fun. Now I always install the power supply in an accessible spot, like a cabinet or behind a removable baseboard. Learn from my pain.
The rest is just tweaking. Everyone’s wall is different, so your perfect angle and distance might vary by half an inch. That’s fine. Play with it, watch the shadows, and trust your eyes. The goal is a warm, organic glow that makes your living room feel like a peaceful retreat, not a showroom.
So if you’ve been waiting for a project that feels both gutsy and practical, this is it. Grab a bag of stucco, a set of good LED strips, and a quiet weekend. You’ll be sitting on your curved sectional with a round wood coffee table in front, watching the light play across your new accent wall, and wondering why you didn’t do this sooner. Save it for your next DIY, and when you finish, tell me how it went. I’d love to hear what your shadows look like.
#texturedaccentwall #ledlighting #stuccowall #livingroomdecor #modernminimalist